
454 Control: reference
Every part of 454 Control’s screen, and what each control does. For your first job from start to finish, see the Control quick start. The ⓘ beside each section in the app gives a short reminder of the same.
The screen
Section titled “The screen”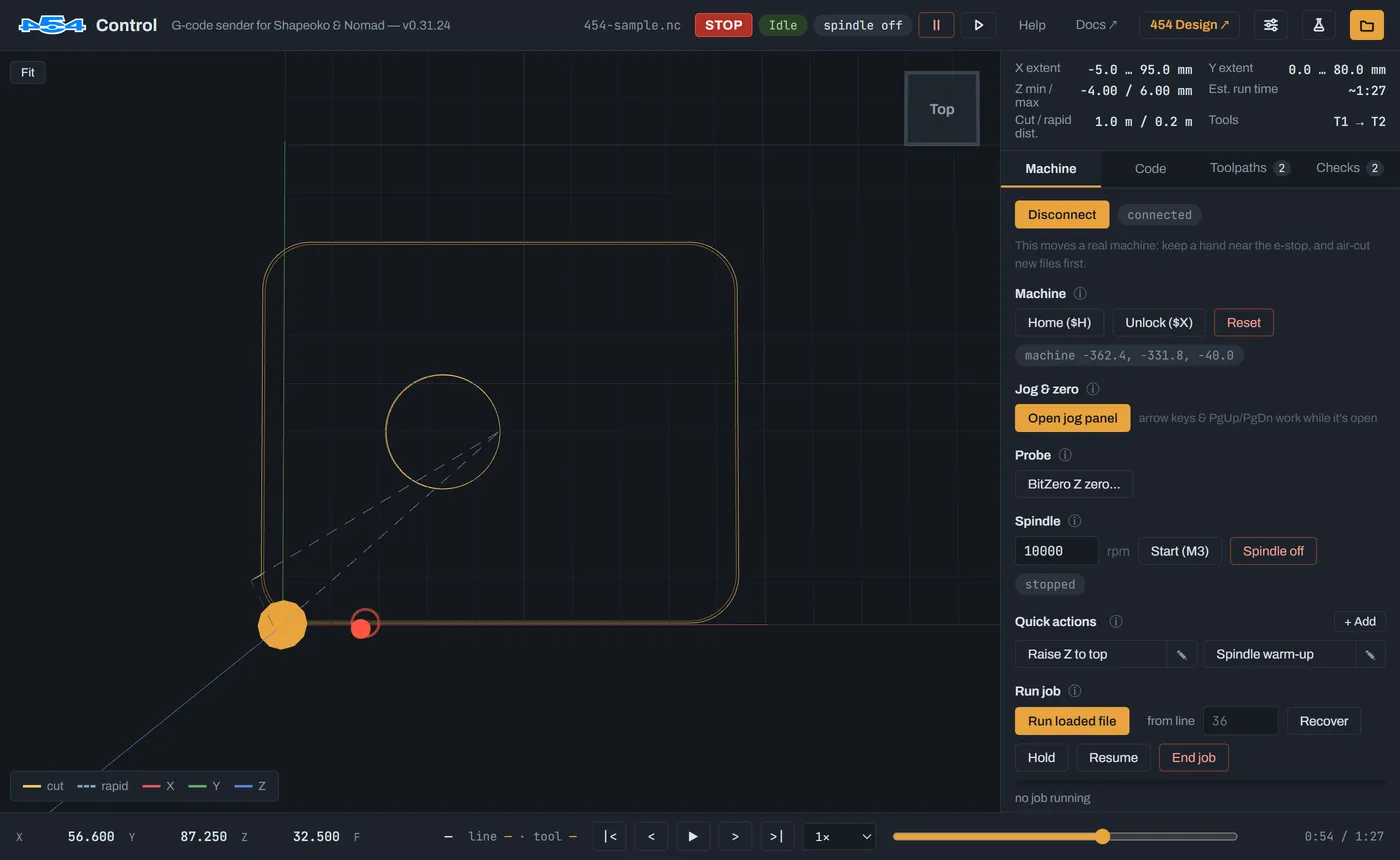
- The header shows the loaded file’s name and, once connected, a red STOP button, the machine’s
state (such as Idle, Run or Alarm), whether the spindle is running, and Hold and Resume. On
the right: Docs, 454 Design, Settings, the sample file, and Open for a G-code file (
.nc,.gcode,.tapor.ngc). You can also drop a file anywhere on the window. - The 3D preview draws the job: cuts as solid lines, rapids dashed. Left-drag to orbit, right-drag to pan, scroll to zoom. The cube in the corner turns the view to Top, Front, Left and so on, and Fit frames the whole job.
- The summary above the tabs gives the job’s extents in X, Y and Z, its estimated run time, how far it cuts and travels, and its tools.
- The tabs: Machine, Code, Toolpaths and Checks.
- The bar along the bottom: the position readout and playback.
The Machine tab
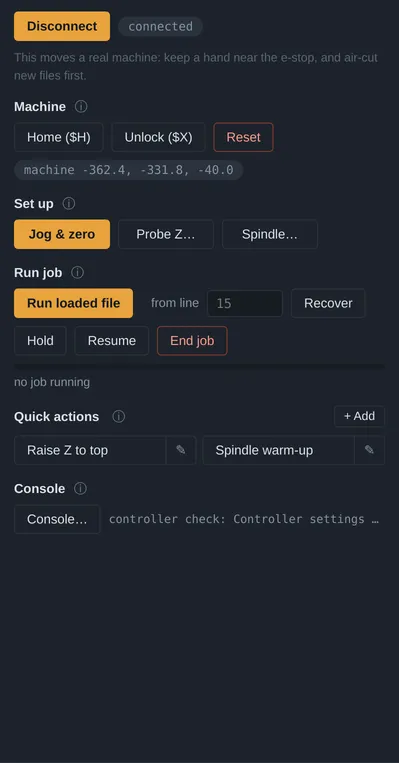
Section titled “The Machine tab”Everything for running the machine, in the order you use it: connecting and homing, setting up (jogging and zeroing, probing, the spindle), running a job, and quick actions. The console opens in a window of its own. It’s the tab Control opens on.
Connecting
Section titled “Connecting”- Switch the machine on and plug it in by USB.
- Press Connect to machine and pick your controller from the browser’s list. After the first time, the button says Reconnect and skips the list; Choose port… picks a different one.
- Control reads the controller’s settings and asks to home the machine. Say yes: homing is required before a job, because lifting clear, parking and the BitSetter all use the machine’s own coordinates.
Control talks to GRBL 1.1 controllers over USB, which covers the Shapeoko and Nomad. The web version needs Chrome or Edge on a computer, because other browsers can’t talk to USB devices; the desktop app works on its own. Everything else, including opening and checking G-code, works anywhere.
Machine
Section titled “Machine”- Home ($H) runs the homing cycle, finding each axis’s limit switch.
- Unlock ($X) clears an alarm without homing. Use it with care: until you home, the machine doesn’t know where it is.
- Reset stops everything at once, as the controller’s reset does.
- The line underneath shows the machine position, in the machine’s own coordinates.
Jog and zero
Section titled “Jog and zero”Jog & zero, under Set up, moves the machine by hand and sets your work zero: where the job’s X0, Y0 and Z0 are on the material.
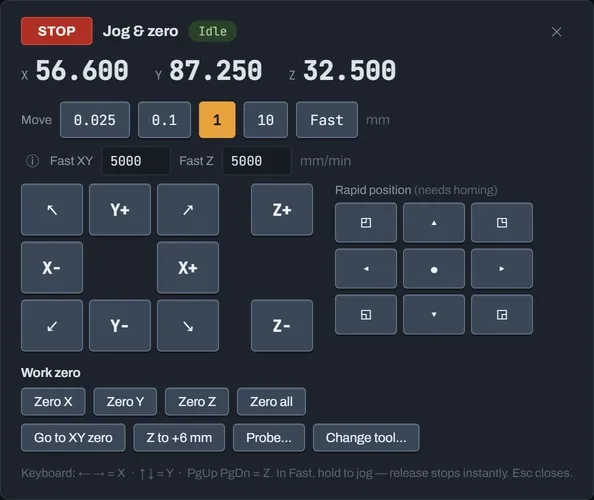
- Move sets how far each press goes: 0.025, 0.1, 1 or 10 mm. In Fast, the machine moves while you hold a button or key, at the Fast XY and Fast Z speeds, and stops the moment you let go.
- The arrow buttons move X and Y, including diagonally; Z+ and Z− move Z. On the keyboard, while the panel is open: ← → for X, ↑ ↓ for Y, PgUp PgDn for Z.
- Rapid position moves quickly to one of nine points around the table: the corners, the middles of the edges, and the centre. It needs a homed machine.
- Work zero: Zero X, Zero Y, Zero Z or Zero all makes the current position zero on those axes. The zero is stored in the controller, so it survives homing and restarting Control.
- Go to XY zero raises Z first, then moves over the job’s X0 Y0. Z to +6 mm moves Z to 6 mm above your Z zero, up or down, as in Carbide Motion, so you can check the zero with a 6 mm block or a rule; X and Y stay put. It needs the machine homed. Probe… opens the BitZero panel; its ← Back to Jog button brings you back here when you’ve probed, without opening Jog & zero again.
- Change tool… changes the bit outside a job, as Carbide Motion’s Change tool does. The machine lifts Z right up, stops the spindle, goes to the tool-change position (Settings → Machine → Parking) and waits. Change the bit, then press Measure the new bit: with the BitSetter set up, the new bit is measured and its length applied, so your Z zero is kept. If the bit that set Z zero wasn’t measured then (you answered Later, or reconnected since), it’s measured first, before the machine goes to the tool-change position. Without a BitSetter, set Z zero again for the new bit before cutting; until you do, Start warns you. It needs a homed machine, and isn’t offered during a job, whose tool changes have their own prompt.
Probe Z…, under Set up, sets Z zero with the BitZero touch plate, which puts Z0 at the top of your material.
- Set the plate’s thickness in Settings → Accessories, measured with calipers from its bottom face to the top face the tool touches, to a tenth of a millimetre. If the number is too small, Z zero lands that much above the material and every cut is that much shallow; too large, and every cut is that much deep.
- Put the whole plate flat on top of the material, not hooked over a corner, close to where you’ll cut, and jog the tool over it, 2 to 10 mm above.
- Touch the pin to the plate to check the circuit, then probe. Control finds the plate quickly, backs off, and measures again slowly for accuracy.
- Check the result with a piece of paper under the tool before cutting.
Spindle
Section titled “Spindle”Spindle…, under Set up, opens a small window: type a speed and press Start (M3), or Spindle off. Starting needs the machine idle, and the spindle chip in the header stops the spindle from anywhere. With a VFD, the speed shown is what was asked for, not a measurement. Starting by hand here doesn’t wait for the spindle to reach speed, so give it a few seconds before cutting. Jobs are different: Control adds a spin-up wait after every spindle start automatically, set in Settings → Accessories.
Running a job
Section titled “Running a job”- Load the file, check its preview and the Checks tab, and set your work zero.
- Press Run loaded file. If the job changes tools, Control first asks how each change should work (see below).
- Read the summary of what will happen, then press Start job.
- While it runs, Hold pauses, Resume continues, and End job stops it: it lifts clear before stopping the spindle.
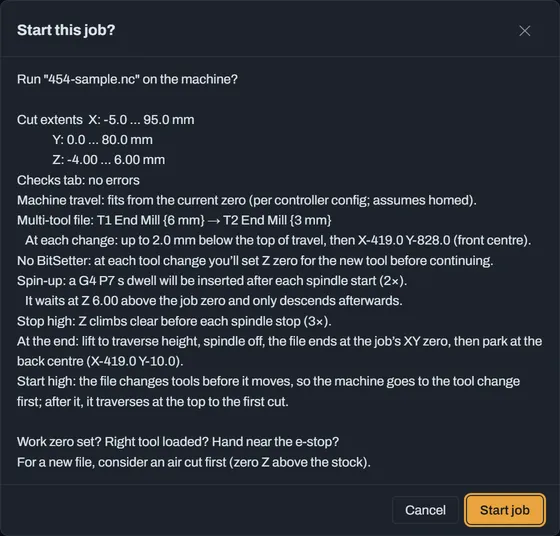
Tool changes. For a job with more than one tool, Control needs a way to set each new tool’s height. With a BitSetter set up, it measures each tool automatically. Without one, it asks what you’d like to do:
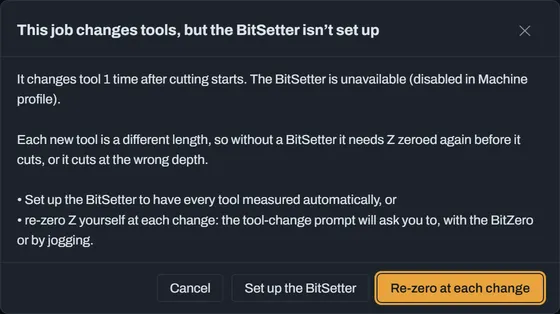
At each change, the machine lifts, moves to the tool-change position, stops the spindle and asks for the new tool; with Re-zero at each change, it then asks you to set Z zero again, with the BitZero or by jogging.
Adjusting a running job. While a job runs, Adjust in the bar over the preview opens four rows, each with what it’s at now beside its name:
| Row | What it changes |
|---|---|
| Feed rate | How fast it cuts, as a percentage of what the file asks for: 10% or 1% at a time, or back to 100%. |
| Spindle speed | The bit’s RPM, the same way. Only for a VFD spindle: with a router (Settings → Spindle type) this row isn’t shown, as its speed is on its dial. |
| Rapid moves | How fast the machine travels in the air between cuts: 25%, 50% or 100%. |
| Depth nudge | Moves every cut down (▼ deeper) or up (▲ shallower), 0.02 or 0.1 mm at a time, for a cut that is a little too deep or not quite through; No nudge puts it back. It takes effect within a few seconds (Control keeps only a few seconds of the job queued at the machine), and Z moves straight up or down by the nudge, even partway along a cut. The Z readout includes it: it shows where the bit is. |
Every job starts with all four at normal: 100% and no nudge. What you adjust in one job ends with that job. To carry it into the next job, tick Keep these for the next job. The next job then asks before it starts, listing what it would keep, and Back to normal there clears it. Setting Z zero always clears the depth nudge.
Pause & lift stops the machine, stops the spindle and lifts Z to the top, staying above the spot. Resume then brings the bit back down where it stopped and carries on, with the same adjustments (with the BitSetter, the bit is measured again first); End job finishes instead. It works on any Shapeoko: Control does the lift itself, rather than relying on the controller’s own “parking”, which stock Shapeoko firmware doesn’t have.
Only what can be done now can be pressed. While the machine is moving on its own (pausing, lifting, ending a job, going to XY zero, homing, probing), every other button that moves it, or sets a zero, is greyed out, and so are the keys and the game controller; STOP never is. While a job cuts, only its own controls can be pressed (Hold, Pause & lift, End job, Adjust), and the jog panel only at a tool change. Resume can be pressed only when there’s something to resume: a hold, or a pause once Z is at the top.
Recover restarts a stopped job from a line, for example after a broken bit: type the line in from line, or scrub the preview to the spot. Control rebuilds the job’s state up to that line, moves back carefully, and lets you back out at any point.
Quick actions
Section titled “Quick actions”Saved G-code for things you do often, like Raise Z to top or Spindle warm-up. + Add makes a new one, and the pencil edits one. Lines are sent one at a time, each waiting for the controller to confirm the last, and any error, alarm or reset stops the action at once. They’re saved with your machine profile.
Console
Section titled “Console”Console… opens the raw conversation with the controller in its own window: everything Control sends, and everything it says back. You can type commands there for anything the app doesn’t cover, once connected.
Beside the button, the Machine tab shows the controller’s latest message, in red if it’s an error. A red number on the button counts the errors that arrived since you last opened the console, so one isn’t missed while the window is shut.
The Code tab
Section titled “The Code tab”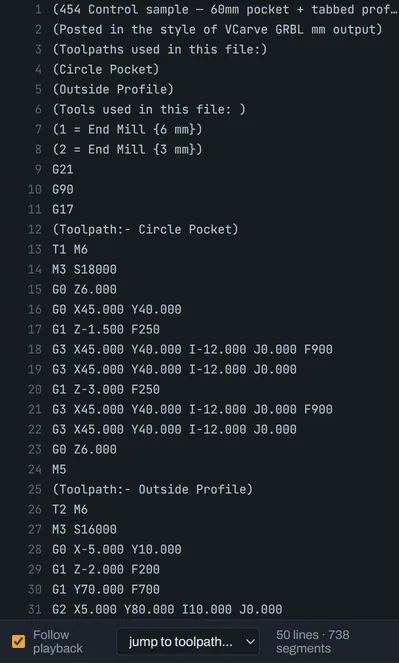
The job’s G-code, line by line. Click a line to move the preview there. With Follow playback on, the list scrolls to keep the current line in view as the preview plays. Jump to toolpath… goes to the start of any toolpath named in the file.
The Toolpaths tab
Section titled “The Toolpaths tab”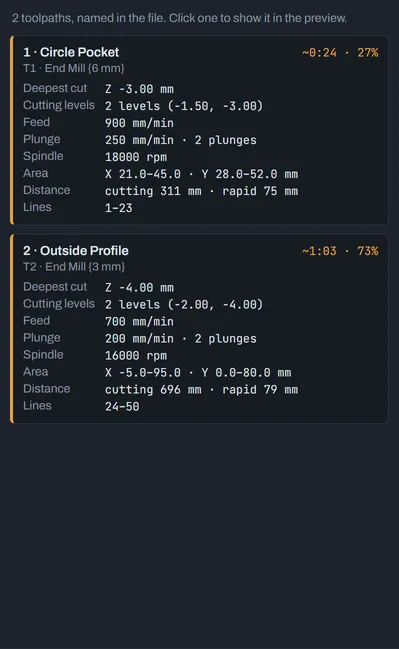
Each toolpath in the file, with its tool, estimated time and share of the job, deepest cut and cutting levels, feeds, spindle speed, the area it covers, and its lines. Click one to show just that toolpath in the preview. If a file doesn’t name its toolpaths, they’re grouped by tool change instead.
Running only some toolpaths
Section titled “Running only some toolpaths”To run part of a job again without going back to Design or your CAM program, untick Run on the toolpaths to leave out. The tab then shows how many will run (2/3), the preview shows the left-out ones faint grey, and Start runs only the ticked ones. The start dialog lists what runs and what’s left out.
Before each toolpath that comes after a left-out one, Control puts the machine where the file expects it:
- It lifts Z to traverse height.
- If the left-out toolpath loaded a different tool, it stops for a tool change, as a job’s own tool changes do (with the BitSetter, the tool is measured).
- It goes to where the toolpath starts, starts the spindle at the file’s speed with your spin-up wait, and comes down: straight down if that’s above the work, or close and then at a slow plunge if it starts in it.
Opening a file ticks every toolpath again. Recover keeps left-out toolpaths left out, and won’t resume from a line inside one. A toolpath that begins partway along an arc, or a file that moves in machine coordinates or changes its work offsets between toolpaths, can’t be split this way: Start says so and runs nothing.
The Checks tab
Section titled “The Checks tab”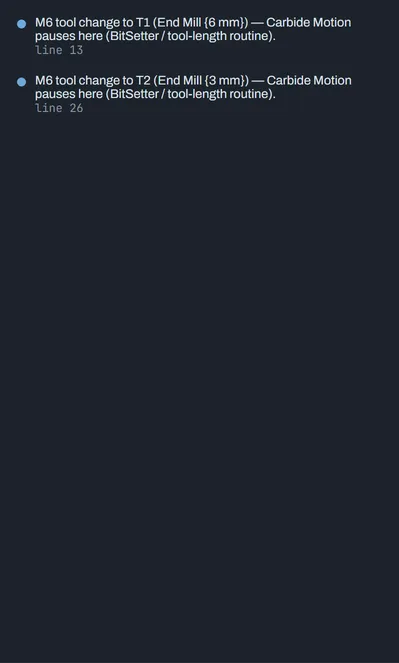
Anything in the file worth knowing before you cut: errors (red) that the machine would refuse or that would make the job go wrong, warnings (orange), and notes (blue) like tool changes. Click one to go to its line. A file with nothing to report says so.
The position and playback bar
Section titled “The position and playback bar”
- X, Y, Z show the work position: where the tool is relative to your work zero. While connected, that’s the machine’s live position; otherwise, the preview’s.
- line and tool show where the preview is in the file.
- The playback buttons go to the start, step back a line, play or pause, step forward a line, and go to the end. The menu sets the speed, from 0.5× to 100×, and the slider scrubs through the job. The time on the right is the preview’s position in the estimated run time.
Playback only moves the preview, never the machine.
Settings
Section titled “Settings”The gear in the header. Settings are saved as you change them, in your machine profile.
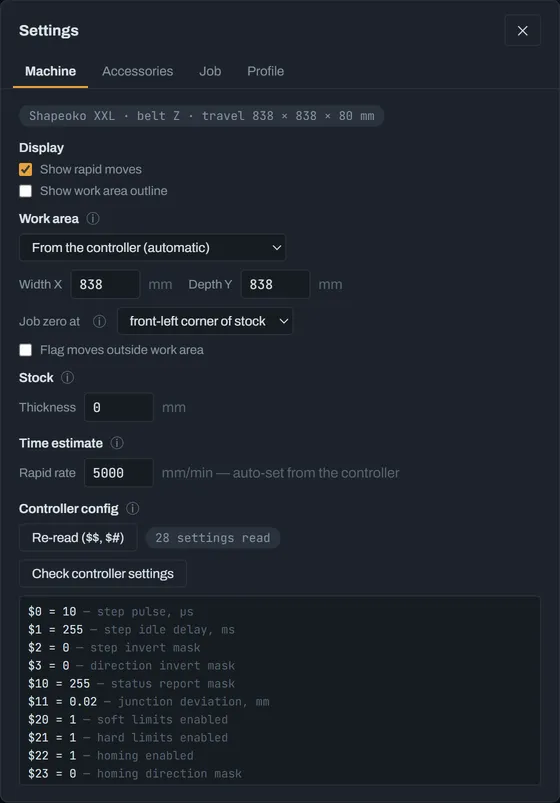
- Machine: what to show in the preview; the work area (from the controller, or a machine you pick), where the job’s zero sits on the material, and whether to flag moves outside the work area; the stock thickness, to flag cuts deeper than the material; the rapid rate used for time estimates; and the controller config, the controller’s own settings as read, with Check controller settings to look them over for anything that would cause trouble.
- Accessories: the BitSetter (jog over it and Capture position; Test touches off once to check it, changing nothing), the BitZero (v1 or v2, and the plate thickness), and the spindle (trim router or VFD, and the spin-up wait after each start: about 2.5 s suits a router, 7 s a VFD; the default is 7).
- Job: Start & stop high, which keeps the bit above clamps and stock whenever it’s travelling (leave it on): at the start of a job it lifts and travels high to the first cut, and after each tool change too. If the file starts with a tool change, the machine goes to the tool change first, and to the first cut after it; the traverse height; how far to lift at tool changes and the end; and where to change tools and where to park at the end of a job.
- Profile: the theme (dark or light) and accent colour, and exporting or importing your machine profile,
including a Carbide Motion
shapeoko.json.
Work area
Section titled “Work area”The size of the machine’s cutting area, used to draw the table in the 3D view and to check that a job fits.
From the controller fills it in from the controller’s own travel ($130 and $131) each time you connect.
Pick a machine from the list, or type a size, and Control keeps that instead, even if the controller reports
something different; the console notes the difference when you connect. Choose From the controller again to
go back.
Job zero
Section titled “Job zero”Where the drawing’s 0,0 sits on the stock: the front-left corner, or the middle. This only affects the preview and the check for moves outside the work area. It doesn’t move your machine’s work zero, which you set with the BitZero or by zeroing the axes.
Stock thickness
Section titled “Stock thickness”The thickness of the material, used to flag cuts that go deeper than it, which usually means into the spoilboard. Set it when Z zero is the top of your material. Leave it at 0 to turn the check off.
Time estimate
Section titled “Time estimate”How long a job will take, worked out the way GRBL moves the machine. Once the controller’s settings are read,
the estimate uses its own limits: the maximum speed and acceleration of each axis ($110 to $112, $120 to
$122) and junction deviation ($11), which sets how fast corners can be taken. Short moves and sharp corners
take longer than their feed rate suggests, and the estimate allows for that.
Before the settings are read, it assumes every move runs at its feed rate and rapids at the rapid rate set here, which underestimates jobs with lots of short moves. The rapid rate changes the estimate only: the machine’s real rapid speed comes from the controller.
Controller config
Section titled “Controller config”The controller’s own $ settings, read back when you connect: travel limits, homing, speeds and the spindle
maximum. Control only reads them. They’re changed in the controller itself, and Carbide Motion’s setup wizard
writes them for Shapeoko machines. Check controller settings compares the ones Control depends on against
what it needs, and reports anything that looks wrong.
BitSetter
Section titled “BitSetter”The fixed button the tool touches so the machine can measure the tool’s length. Jog the tool over the button and press Capture position; Test touches off once to check it, changing nothing.
When you set Z zero, Control offers to measure that tool straight away. That makes it the reference: at Start the loaded tool is measured against it, and every new tool at each change, so the zero holds through tool changes, and a bit swapped before you press Start is caught instead of silently shifting Z. It needs a homed machine, because the button’s position is in the machine’s own coordinates.
BitZero
Section titled “BitZero”The touch plate used to set your work zero. Control uses it for Z. Choose v1 or v2 and enter the plate’s thickness, measured with calipers from its bottom face to the top face the tool touches: a BitZero v2 is about 15.5 mm, but measure your own, because every depth you cut is off by whatever this number is off. The probe sets Z0 at the top of the stock: the height where the tool touched, less the thickness. Touch the pin to the plate to check the circuit before probing, and check the zero with a piece of paper before cutting.
Game controller
Section titled “Game controller”An Xbox-style game controller, USB or Bluetooth, makes a handy pendant at the machine. Tick Jog with a game controller in Settings → Accessories, plug the controller in (or pair it), and press any button on it: the browser only shows Control a controller once a button has been pressed. The setting says Connected and its name. That first press does nothing.
| On the controller | What it does |
|---|---|
| Left stick, held | Jogs X and Y, in eight directions, at the Fast XY speed |
| Right stick, up or down, held | Jogs Z at the Fast Z speed |
| LB, held with a stick | Slow: a fifth of the speed, for creeping up on an edge |
| D-pad | One step in X or Y, of the size chosen in the jog panel (1 mm when that’s Fast) |
| Y / A | One step up / down in Z |
| X | The next step size: 0.025, 0.1, 1, 10 mm |
| B | Stop: cancels a jog. During a job, Hold |
- Let go and it stops. A held jog is cancelled the moment the stick comes back past a quarter of its travel, and goes no further than the machine’s travel allows, as the jog panel’s do.
- One direction at a time. Push the stick a new way while jogging and the jog stops: bring the stick back to the middle, then push again. The same after anything else stops a jog (B, the window losing focus, the page going into the background, the controller switched off).
- It jogs only when the jog panel could: connected and idle, not during a job except when it’s stopped at a tool change, and not while probing or running a quick action.
- It can’t start anything. No Start, no Resume, no zeroing and no spindle from the controller: a knocked button only ever jogs or stops. Resume a held job, and set zero, on the screen.
Spindle type and spin-up
Section titled “Spindle type and spin-up”Trim router or VFD spindle, and how long to wait after the spindle starts (M3 or M4) before any cutting move. Most G-code files don’t include that wait, so Control adds one after each spindle start. Carbide Motion does the same, at about 2.5 s, which suits a router. A VFD spindle takes longer to reach speed: 7 s is the default here. Too short, and the bit enters the material before it’s up to speed.
Start and stop high
Section titled “Start and stop high”Keeps the tool high whenever it’s travelling, not cutting. Leave it on. At the start of a job and after every tool change, the machine moves to the next XY position at the top of its travel before it plunges. Before every spindle stop, and at the end of the job, it lifts clear first. This is what stops a bit dragging across clamps and stock. A lift is skipped when the tool is already higher than the traverse height, so it never moves down.
Traverse height
Section titled “Traverse height”How far below the top of Z travel the machine sits when it’s moving, not cutting, in the machine’s own coordinates. It’s used by Start and stop high, Go to XY zero, the BitSetter’s moves and the end of the job. 5 mm below the top is a good default; make it more if you have tall clamps.
Tool-change and end-of-job positions
Section titled “Tool-change and end-of-job positions”Two separate places the machine goes when you need to reach it.
Tool change: it lifts to near the top of Z travel and moves here before asking for the new tool. With nothing captured it uses the front centre of the machine, worked out from the controller’s travel, which is the easiest place to reach. Pick another preset or capture a position to change that.
End of a job: as in Carbide Motion, it lifts, stops the spindle, returns to the job’s XY zero, then parks. With nothing captured it parks at the back centre of the machine, out of your way; capture a position to park somewhere else.
Both use the machine’s own coordinates, so they need a homed machine.
Jog speeds
Section titled “Jog speeds”The feed rates the jog buttons and arrow keys use in Fast mode, for XY and for Z separately. They apply to jogging only and have no effect on a running job. Keep Z slower than XY: it’s the axis that finds clamps.
Keyboard shortcuts
Section titled “Keyboard shortcuts”| Keys | What they do |
|---|---|
| Space | play or pause the preview |
| ← → | step the preview back or forward a line |
| ← → ↑ ↓ PgUp PgDn | jog X, Y and Z, while the jog panel is open |
| Esc | close the open panel or dialog |