
454 Design: workspace
Everything in 454 Design around the drawing tools themselves: setting up the job, layers, your tools, the Toolpaths panel, checking the drawing, and Settings. For the drawing tools, see Design tools; for every toolpath type and setting, the CAM reference.
The screen
Section titled “The screen”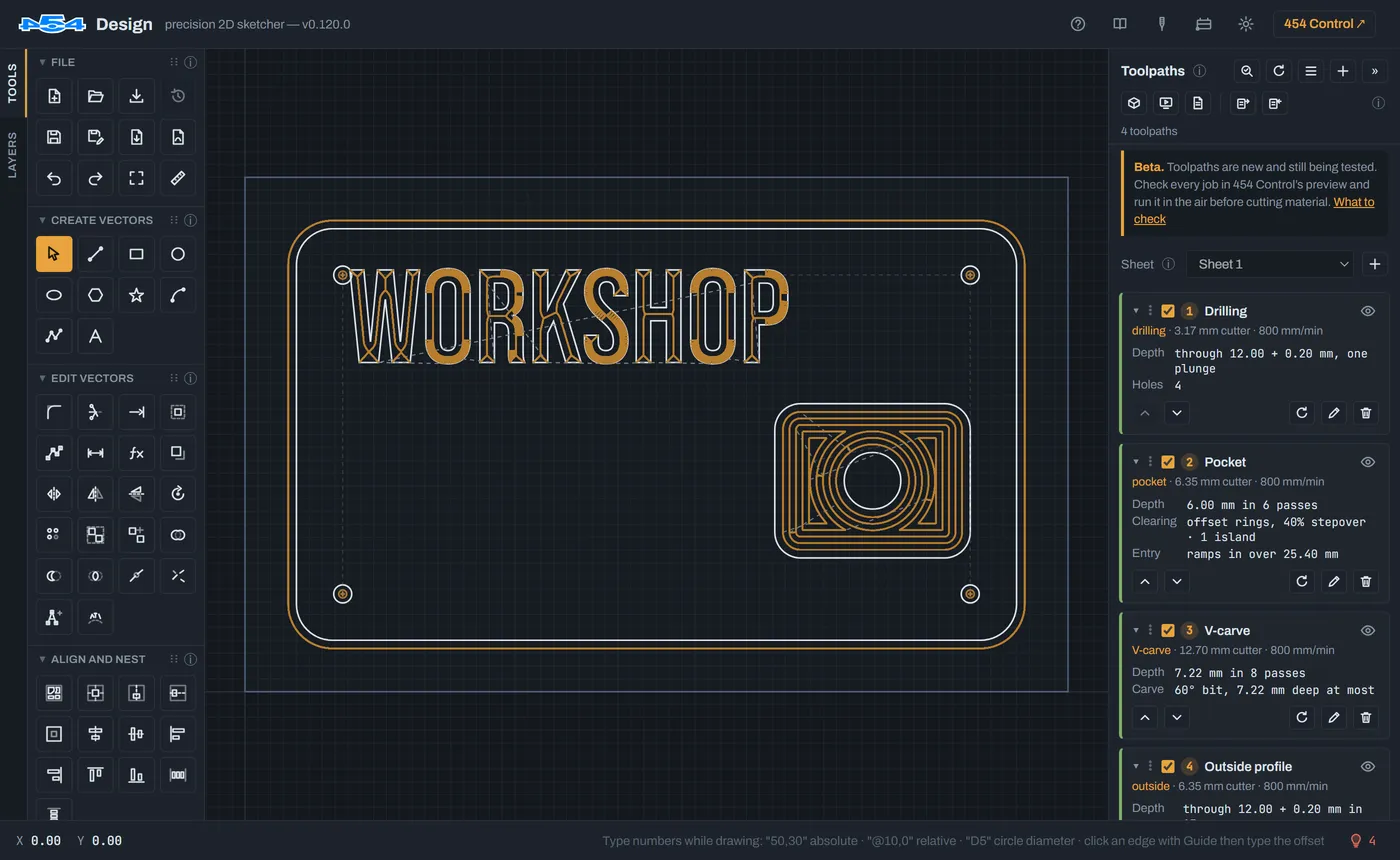
- The header: the drawing’s file and whether it’s saved (Saved, or ● Changed, not saved until you save it again; point at the name to see where the file is), then Docs, the Tool library, Job setup, Settings, and 454 Control. The window’s title shows the file too, with a • while it has changed.
- On the left: the Tools tab holds the tool groups, and the Layers tab the layers. « at the bottom of the tabs folds the panel away, leaving just the tabs; click » or either tab to open it again.
- In the middle: the drawing, on the material. Scroll to zoom, drag with the right or middle mouse button to move around, and press Home to fit what you’ve drawn in the window (the material, when nothing is drawn yet).
- On the right: the Toolpaths panel. » collapses it to a narrow strip; click the strip to open it again. Fold both away for the most drawing room. Each stays as you left it.
- Along the bottom of the drawing: the History bar, every change you’ve made, to go back to.
- Along the bottom: the status bar.
Job setup
Section titled “Job setup”The material you’re cutting, and where the machine’s zero will be. Everything else is measured from these, so it’s worth setting first. Open it from the header, or Settings → Job setup….
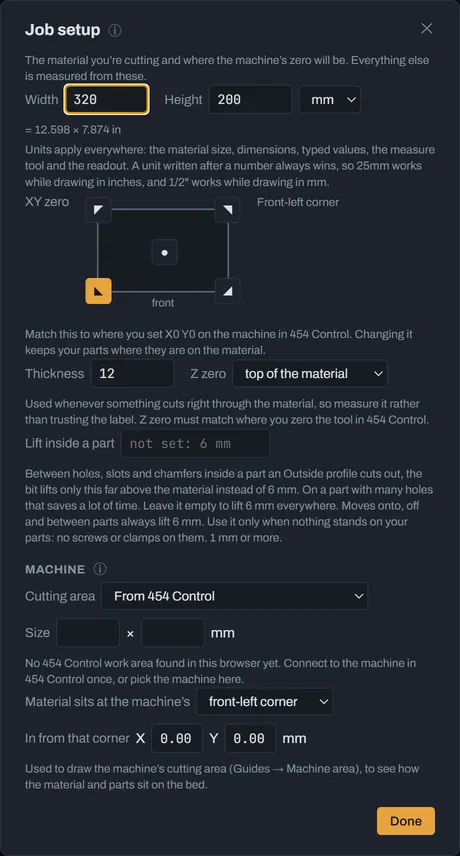
- Width, Height and units. The units apply everywhere: the material, dimensions, typed values, the
measure tool and the readout. They’re saved with the drawing, so it opens in the same units on any computer, and
new drawings start in the last units you chose. A drawing saved before Design kept its units opens in inches if its
material is a whole number of sixteenths of an inch (48 × 48 in, say), and otherwise in this computer’s units. A unit typed after a number always wins, so
25mmworks in an inch drawing. - XY zero: where X0 Y0 is on the material: one of the four corners, or the centre. Match it to where you’ll set X and Y zero on the machine in 454 Control. Changing it keeps your parts where they are on the material.
- Thickness and Z zero: the top of the material, or the spoilboard under it. The thickness is used whenever something cuts right through, so measure it rather than trusting the label. Z zero must match where you zero the tool in 454 Control.
- Lift inside a part: between one hole, slot or chamfer and the next, the bit lifts 6 mm above the material, to clear clamps and screws. Set this to lift less, 2 mm say, when moving within a part that an Outside profile cuts out. On a part with many holes, that saves a lot of up and down. Moves onto, off and between parts still lift 6 mm, and so does any move that would cross the edge of a part (an L-shaped part’s corner). Leave it empty to lift 6 mm everywhere. Use it only when nothing stands on your parts: no screws or clamps on them.
- Machine: the machine’s cutting area (from 454 Control, a Shapeoko or Nomad size, or your own), which corner the material sits against, and how far in. It’s used to draw the cutting area (Guides → Machine area), so you can see how the material and parts sit on the bed.
Layers
Section titled “Layers”The Layers tab, on the left. Layers keep a drawing organised, and let you hide or lock parts of it while you work on the rest.
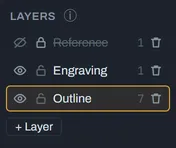
- The active layer is outlined: new shapes go on it. Click a layer to make it active.
- The eye shows or hides a layer. Hidden layers are drawn struck through, and their shapes can’t be selected.
- The lock stops a layer’s shapes being selected or changed, while still showing them.
- The number is how many shapes the layer holds. Double-click a name to rename it.
- With shapes selected, a layer offers to move them onto it.
- The bin deletes a layer; the last one can’t be deleted. + Layer adds one.
Layers and sheets are separate: every sheet has every layer.
Sheets
Section titled “Sheets”A project that needs more than one piece of material has a sheet for each: the sides of a cabinet on one, the shelves on another. The Sheet bar is at the top of the Toolpaths panel.

- Add a sheet with the + beside the sheet’s name. The first time, everything drawn so far becomes Sheet 1, and the new Sheet 2 is shown, empty.
- One sheet is shown at a time. Choose it from the list. Its shapes, dimensions and toolpaths are the only ones you see, select, snap to, trim against, nest, check and export.
- New shapes go on the sheet being shown. To move shapes to another sheet, cut them (Ctrl+X), change sheets, and paste in place (Ctrl+Shift+V). Their dimensions come with them; make their toolpaths again on the new sheet.
- Each sheet has its own toolpaths and its own G-code. Save G-code saves the sheet being shown, in a
file named for it (
Cabinet - Sides.nc), so a file can never put two sheets’ parts on one piece of material. A toolpath can’t take shapes from two sheets. The job sheet and the previews cover the sheet being shown too. - The pencil renames the sheet. The bin deletes it, with its shapes, dimensions and toolpaths, after asking; Ctrl+Z brings it back. The last sheet can’t be deleted.
- Every sheet uses the material in Job setup: the same size, thickness and zero. Parameters and layers are shared by all the sheets, so a toolpath template applies to each sheet by its layer names.
A multi-sheet VCarve project opens with its sheets, named as in VCarve.
The tool library
Section titled “The tool library”Your bits, their tool numbers, and their feeds and speeds for each material. Open it from the header. It’s shared with 454 Control.
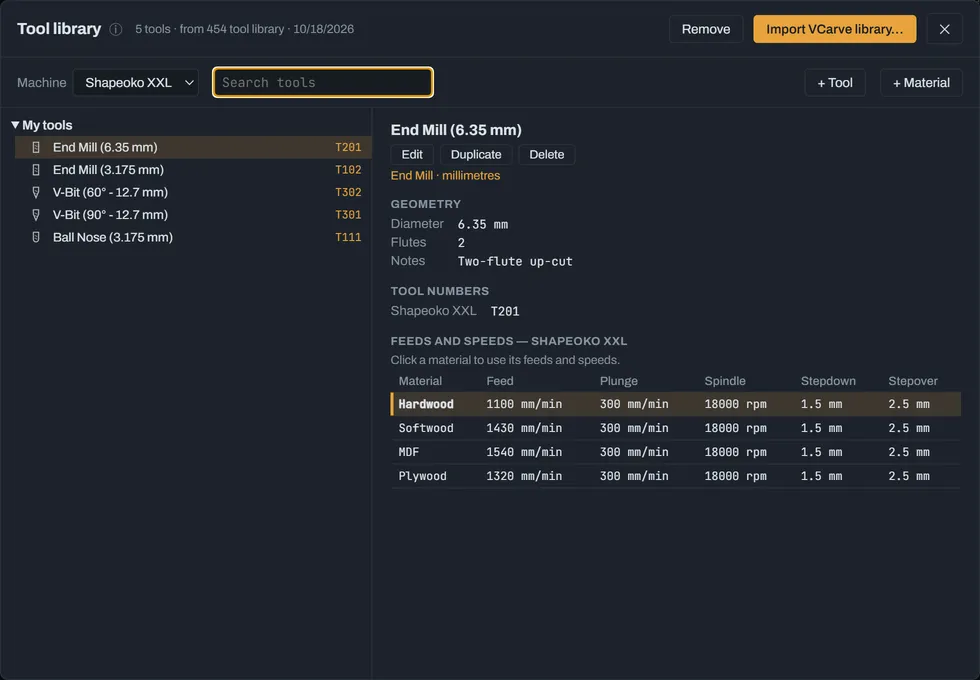
- Import VCarve library… brings in a VCarve tool database (
.vtdb), with its folders, tool numbers, and feeds and speeds for each machine and material. Or build your own: + Tool adds a bit, and + Material a material. - Select a tool to see its geometry, its tool number on each machine, and its feeds and speeds for each material. Edit, Duplicate or Delete it there.
- Choose the material by clicking its row in a tool’s Feeds and speeds list: it’s highlighted, and new toolpaths take that material’s feeds and speeds. Every material in the library is listed, so a material the tool has none for yet says so; choose it and Edit to add them. While editing a tool, the materials are buttons above its feeds and speeds. Machine, at the top, chooses which machine’s feeds and speeds are shown.
- Search tools finds a bit by name. Tools you’ve used lately gather in a Recently used folder at the top.
The Toolpaths panel
Section titled “The Toolpaths panel”Where a drawing becomes a job. Toolpaths are in beta: check every job in 454 Control’s preview, and run it in the air, before cutting material.
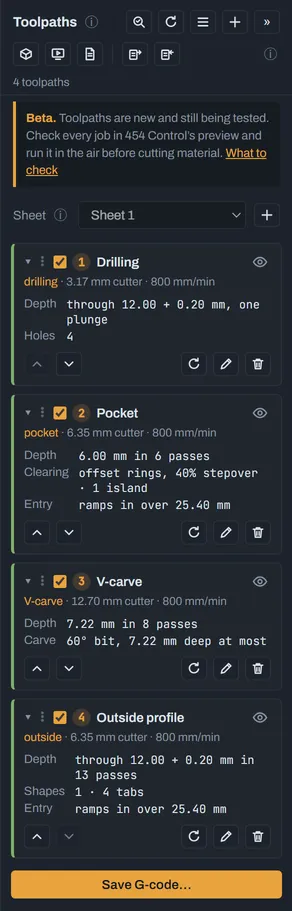
- Select the shapes to cut, then press + (New toolpath) at the top of the panel, or the + key.
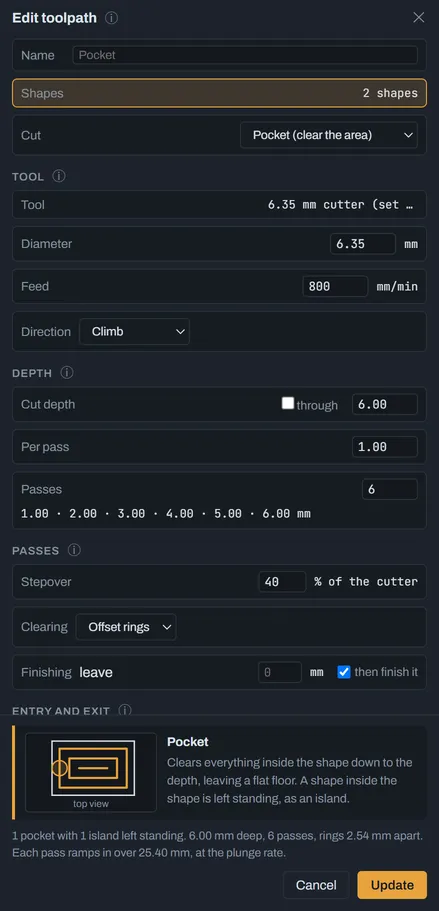
- In the editor, choose what kind of cut it is, the tool and the depth, and check the rest. Nothing is worked out while you change settings, as in VCarve, so typing never lags; editing a toolpath, the drawing shows it as it was last worked out.
- Press Create. The toolpath is worked out, with a Working… panel while it is, and gets a card in the panel. If none of the shapes selected can be cut (open lines for a pocket, say), or none are selected, it says so and makes nothing; if only some can, it says which were left out.
- When they’re all made, press Preview in 454 Control to check the job in Control’s 3D preview, then Save G-code… for the file to run, and Job sheet… for a printable page to keep at the machine.
The editor holds everything about one toolpath: its shapes, the kind of cut, the tool (its diameter comes from the tool), the depth or through, the depth per pass, and the settings that kind of cut uses, such as the stepover and clearing pattern for a pocket, the direction, and a finishing pass. Nothing is guessed: Create stays disabled until you’ve chosen a tool and a depth.
Each card shows the toolpath’s number in the cutting order, its tool and feed, and a summary of its depth and details. On each card:
- The tick box includes it in the G-code, or leaves it out. The eye shows or hides its preview.
- The arrows move it earlier or later in the cutting order; you can also drag a card by its handle.
- Recalculate (↻) rebuilds it from its shapes and the material as they are now. It’s highlighted when the toolpath is out of date. Recalculate all, at the top of the panel, does every toolpath.
- The pencil opens it in the editor; the bin deletes it.
- Right-click a card for the same actions in a menu.
At the top of the panel: Check (below), Recalculate all, + for a new toolpath, and » to collapse the panel. A VCarve project with toolpaths offers to make them editable here.
Checking the drawing
Section titled “Checking the drawing”Check, at the top of the Toolpaths panel, looks the drawing over before you cut: open outlines, stray pieces, shapes drawn twice, outlines that cross themselves, and shapes no toolpath cuts.
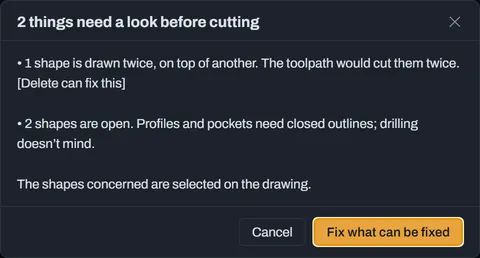
The shapes concerned are selected on the drawing, so you can see them. Fix what can be fixed does what it safely can, such as deleting a shape drawn twice, and says what’s left for you. A drawing with nothing to report says so.
Settings
Section titled “Settings”The gear in the header.
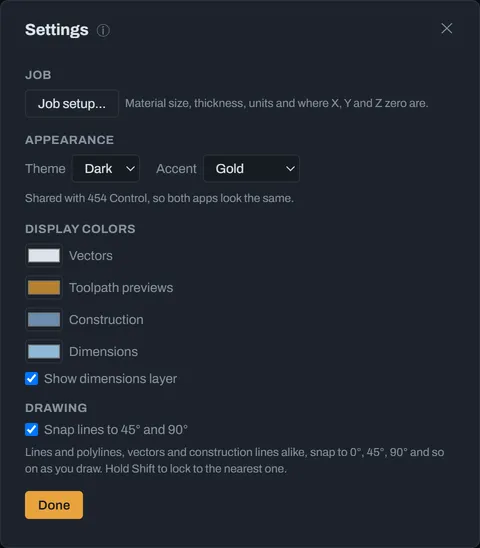
- Job setup… opens Job setup.
- Theme and Accent: dark or light, and the accent colour. They’re shared with 454 Control, so both apps look the same.
- Display colours for the drawing’s vectors, toolpath previews, construction lines and dimensions, and whether to show the dimensions.
- Snap lines to 45° and 90°, on unless you turn it off: lines and polylines snap to 0°, 45°, 90° and so on as you draw them.
History
Section titled “History”Every change you make is a step on the History bar, along the bottom of the drawing, oldest on the left. Each step is its tool’s icon (a rectangle, a fillet, an offset, a toolpath); point at one, or tab to it, to see its name: Rectangle, Fillet corners 6 mm, Offset 3 mm, Toolpath Pocket 1, and when it was made. It’s the same list Undo goes back through, but you can see it and jump straight to any step.
- Click a step to see the drawing as it was just after it, toolpaths and all. The steps after it stay on the bar, faded, and the step you’re on is outlined. Click a later step to come forward again; nothing is lost by looking. The first button, Start, is the drawing before the first step.
- The marker, the amber line with a handle just after the step you’re on, works as Fusion’s does: drag it along the bar and let go to go back or forward to there. Click it and the arrow keys move it a step at a time; Home and End go to the start and the end.
- Right-click a step to go to it, change it, or Delete this step: it’s taken out, and the steps after it are done again without it. One that needed it (an offset of a shape that’s gone) turns red. Undo puts it back. A step that opened or started a drawing can’t be deleted.
- Remove all steps after the marker, in the same menu when you’ve gone back, throws away the faded steps for good (Undo still brings them back).
- Undo (Ctrl+Z) and Redo (Ctrl+Y) move one step along the same line.
- Changing something while you’re back at an earlier step puts the change in there, as in Fusion. The faded steps after it stay on the bar, and when you come forward to them (click a later step, or Redo) they’re done again on top of your change. One that can’t be, because the shapes it changed aren’t there any more, turns red and is skipped; hover over it to see why. The marker shows where you are: the faded steps after it are the ones that will be redone.
- The history is saved with the drawing. Save puts it in the drawing’s file, and opening the file brings it back, so you can go back to how a project was last week. It’s kept between visits too, with the drawing.
- A new drawing starts a new history, and an opened one has its own, saved with it. The drawing that was open is in its file, or put aside for File → Recover last drawing.
- Scroll the mouse wheel over the bar to move along a long history, and click the History button (the clock at its left end) to fold the bar away, or open it again.
The last 500 steps are kept.
Changing a step
Section titled “Changing a step”As in Fusion, you can go back and change a step, and everything after it is done again.
- Double-click the step on the History bar. A small panel shows its numbers.
- Change them, and click Change (or press Enter).
- Every step after it is done again, on the drawing as it now is. With a long way to go, the Working panel shows how far it’s got.
What can be changed:
| Step | Its numbers |
|---|---|
| Rectangle | X, Y, width, height |
| Circle | centre X and Y, diameter |
| Line | start and end |
| Text | the text, its height |
| Fillet (one corner), Fillet corners | the radius |
| Offset | the distance |
| Array | how many, and how far apart (a row) or the angle between and the centre (around a point) |
| Move (dragging shapes, the arrow keys) | how far across and up |
| Move point (dragging a point with the Node tool) | how far across and up |
| Resize, Rotate, and moves typed into the selection box | the size, angle or position typed |
| Scale, Stretch and Rotate by dragging the selection’s handles | how much, across and up, or the angle |
Steps that follow parameters. In the panel, a length can be a parameter, or
arithmetic with one: wall, bit / 2, material - 3. The step remembers it, and the box shows it with its value
(wall = 6.00 mm). Then change the parameter in the fx list, or the material’s thickness in Job setup, and the
step takes the new value: every step after it is done again, so what was made from it follows. Link a rectangle’s
width to width and an offset round it to wall, and changing either reshapes the rectangle, the offset, its
rounded corners and the toolpaths on them, together. One Undo takes the whole change back. Typing a plain number
unlinks it.
Counts, angles and percentages can follow parameters too: an array’s How many can be count, a rotation angle.
For those, a parameter is the number it was typed as, whether your drawing is in millimetres or inches: count = 5
makes 5 copies and angle = 30 turns 30°. A count must come to a whole number from 2 to 500.
How the steps after it are done again:
- Fillets, offsets, Mirror, Weld, Subtract and Intersect, moves, resizes and rotations are done again by the tool, on the shapes they worked on, as those shapes are now. Make a rectangle wider and its rounded corners are rounded again at the new size; an offset or a mirror copy of it follows it; a weld it was part of is welded again; a move still moves it by the same amount. The shapes a step made keep their identity, so the steps after it still find them, and toolpaths cut the shapes as they now are. Mirror, Weld, Join, Explode, Trim and Extend have no numbers of their own, but follow the steps before them: Trim cuts the same part of the shape (the same side of it, if it’s grown) where whatever crosses it crosses it now, and Extend reaches whatever is in its way now.
- A rounded corner, or a point moved, is the same one of the outline, counted round it. If the outline has a different number of corners or points by then, the step is red rather than changing the wrong one. A point moved is moved as far as it was, from wherever the shape now is.
- Anything else is done again as it was: a shape drawn is drawn again, a shape deleted is deleted again, and a change to a shape is made again, but only if that shape is still exactly as the step found it.
- A step that can’t be done again turns red and is skipped: the shape it works on is gone (an offset too big to leave a shape, say), or it changed a shape that’s now different, such as a point dragged by hand on an outline that’s now a different size. 454 never guesses what you meant. Hover over a red step to see why. A later change that makes it possible again brings it back. A red step’s icon is red, and its name says why it was skipped.
Undo (Ctrl+Z) takes back a change to a step, as it takes back anything else: whichever you did last. Redo (Ctrl+Y), straight after, puts it back.
The status bar
Section titled “The status bar”
- X and Y on the left: where the pointer is on the drawing.
- The middle says what the current tool wants next, and what you can type.
- The bulb on the right shows recent messages: everything Design has told you, in case one disappeared before you read it.